Last Updated on February 8, 2026
iPhone can screen record easily but audio and call recording are where most people get stuck.
Apple’s built-in screen recorder works well for capturing your screen, but it has strict limitations by design. It can record your screen instantly, can record your voice if enabled, cannot record internal app audio natively, and cannot record phone calls using screen recording at all.
Most guides skip these details or give misleading instructions. This one doesn’t.
This guide shows:
- How to screen record on iPhone in under 60 seconds
- Why your recordings are silent (and how to fix it)
- What audio iPhone can and cannot record
- Legitimate ways to record phone calls (with legal warnings)
- Which methods actually hold up after iOS updates
If you only need a basic screen recording, this is quick.
If you need audio or call recording, this guide will save you hours of trial and error.
How to Screen Record on iPhone (Quick Setup)
Let’s get you recording in the next 60 seconds. Screen recording lives in your Control Center that panel you swipe down from the top-right corner of your screen (or swipe up from the bottom on older iPhones).
Adding Screen Recording to Control Center
Most newer iPhones come with screen recording already enabled, but if you don’t see it, here’s how to add it:
- Open Settings
- Tap Control Center
- Scroll down to More Controls
- Find Screen Recording and tap the green + button next to it
- It’ll move up to the “Included Controls” section

That’s it. The screen recording button is now in your Control Center.
How to Start Recording
- Open Control Center (swipe down from top-right, or up from bottom on older models)
- Tap the screen recording button it looks like a solid circle inside a circle
- You’ll see a 3-second countdown
- A red bar appears at the top of your screen (or red bubble on newer models) this means you’re recording
- Do whatever you need to record. Switch apps, scroll, tap everything on screen gets captured.
How to Stop Recording
Two ways to stop:
- Tap the red status bar at the top of your screen, then tap “Stop”
- Open Control Center again and tap the screen recording button (it’ll be red/highlighted)
You’ll get a notification that your recording was saved.
Where to Find Your Recording
Your screen recording automatically saves to the Photos app. Open Photos and check:
- Recents album (it’ll be your newest item)
- Videos album
From there, you can trim it, share it, or delete it just like any other video.
Recording With Sound on iPhone (What Actually Works)
iPhone screen recording can record your voice, but it does not natively record internal app audio. This limitation is intentional and is the reason most people end up with silent recordings.
The Two Types of Audio You Need to Understand
iPhone treats these two audio sources very differently. Mixing them up is the #1 cause of confusion.
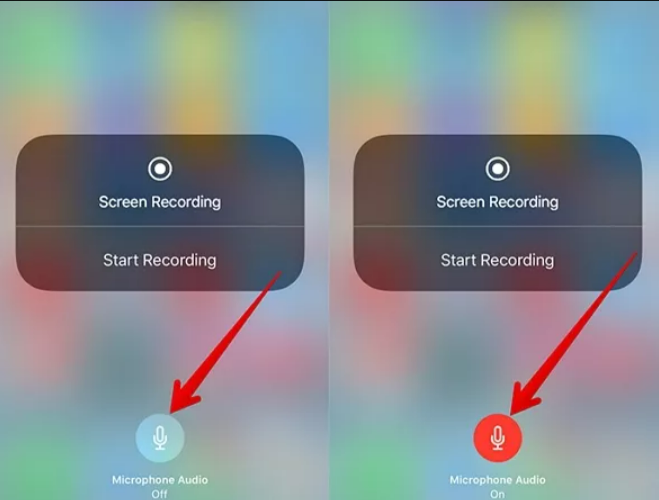
1. Microphone Audio (Your Voice)
This captures sound from outside the phone, including: Your voice, Room noise and the Anything the iPhone microphone can hear
Use this when you are:
- Recording a tutorial with narration
- Explaining steps on screen
- Adding commentary to gameplay
How to enable it:
- Long-press the Screen Recording button
- Turn Microphone ON (it should appear red)
If the microphone is off, your recording will contain no narration at all.
2. Internal Audio (Apps, Music, Videos)
This is audio playing inside the phone, such as:
- Spotify music
- YouTube video sound
- Game audio
- App notification sounds
iPhone does not natively record internal audio during screen recording. This is not a bug. It is an Apple design decision tied to privacy and copyright protection. When you screen record a video or game, the visuals are captured, but the app’s audio is excluded.
How to Record Internal Audio (Best to Worst Options)
If you need internal audio, these are your realistic options ranked by reliability.
1. Mac + QuickTime Player (Best and Most Reliable)
This is the cleanest and most stable method available.

How it works:
- Connect your iPhone to a Mac (cable or wireless on newer macOS)
- Open QuickTime Player
- Go to File → New Movie Recording
- Select your iPhone as the camera and microphone source
- Click Record
2. Third-Party Recording Apps (Unreliable Long-Term)
Some third-party apps, such as Record it! or Screen Recorder+, claim to capture internal audio on iPhone, but results are inconsistent.These apps typically rely on screen mirroring techniques or indirect workarounds rather than true internal audio access, which can lead to reduced audio quality or unstable recordings. Most of them require a paid subscription, usually in the $5–15 per year range
3. The Speaker Trick (Last Resort)
The simplest workaround for capturing internal audio is to play the sound out loud through your iPhone’s speaker and record with the microphone turned on. In this setup, your screen recording captures whatever the microphone hears, including the audio you’re playing. The trade-off is quality.
How to Record Phone Calls on iPhone (What’s Actually Possible)
Yes, you can record phone calls on iPhone but not with the built-in screen recording feature, and only by using specific workarounds. Apple places strict limits on call recording for privacy reasons, so there is no native way to record both sides of a phone call directly on iPhone.
Legal Note (Read Before Recording)
Before recording any phone call, be aware that call recording laws vary by location. Some regions require consent from all parties on the call, while others allow one-party consent. Always inform the person you’re speaking with that the call is being recorded and check your local laws.
This guide explains how recording works, but whether it is legal in your situation is your responsibility.
Why Screen Recording Doesn’t Work for Phone Calls
If you’ve tried using screen recording during a call, you may have noticed that it only captures your own voice, while the other person’s audio is missing. This is intentional. Apple blocks call audio from being captured during screen recording to protect user privacy. Because of this restriction, recording calls on iPhone always requires an alternative method.
Method 1: Google Voice (Free, but Limited)
Google Voice offers a free and transparent way to record calls, but with clear limitations. It only works for incoming calls, requires a Google Voice number, and is available primarily to US-based users. When recording starts, the service automatically announces that the call is being recorded, so there is no way to record discreetly.
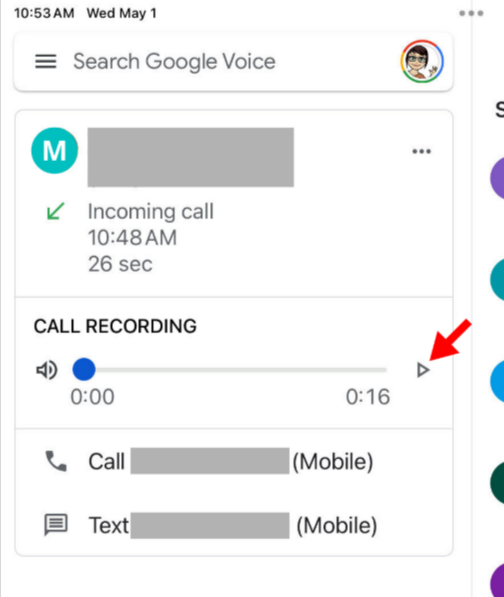
How to do it:
- Set up a free Google Voice number at voice.google.com
- In Google Voice settings, enable “Incoming call options”
- When you receive a call, press 4 on your keypad during the call to start recording
- Press 4 again to stop
The recordings are saved to your Google Voice account. This method is reliable and legally transparent, but it won’t work for outgoing calls and requires you to route calls through Google Voice.
Method 2: Third-Party Call Recording Apps (Most Practical)
Apps such as TapeACall, Rev Call Recorder, and IntCall bypass Apple’s restrictions by creating a three-way conference call between you, the person you’re speaking with, and the app’s recording line. This allows the app to capture both sides of the conversation.
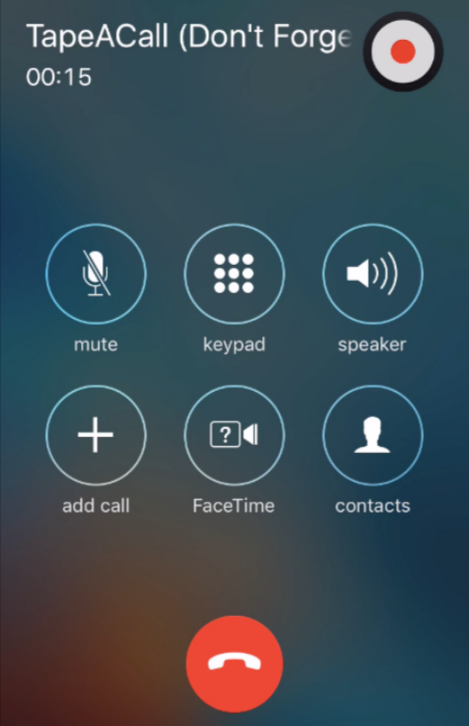
How they work:
- Download the app (most offer free trials, then charge $10-20/year)
- Start a call with the person you want to record
- Open the app and tap “Record”
- The app dials its recording line and merges it into a three-way call
- Everything gets recorded on the app’s servers
- After the call, download your recording from the app
However, they are the most reliable option for recording both incoming and outgoing calls on a regular basis.
Method 3: Use Another Device (Simple and Old-School)
The simplest workaround requires no apps or subscriptions. You place your iPhone call on speaker and use another phone, laptop, or voice recorder to capture the conversation. This method works anywhere and costs nothing, making it useful for occasional recordings or backup situations.
The trade-off is audio quality. Background noise, room echo, and distance from the microphone all affect the recording. It’s not ideal for professional use, but it’s perfectly acceptable when convenience matters more than clarity.
Screen Recording Settings & Customization
Once you understand how screen recording works, a few small setting changes can make a noticeable difference in quality, file size, and privacy. These adjustments help you avoid common mistakes and produce cleaner recordings without extra tools.
Adjusting Video Quality
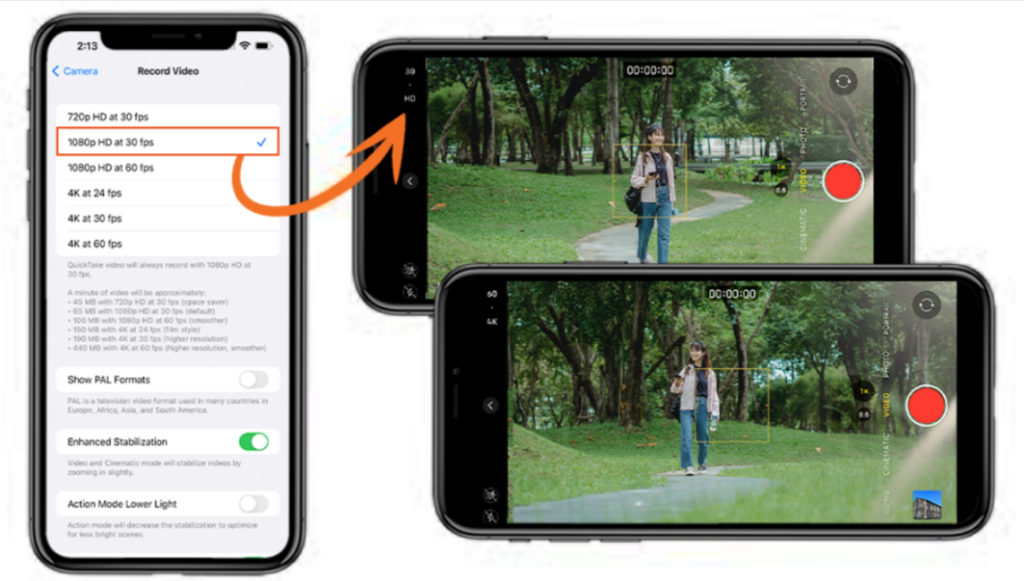
Screen recordings follow your iPhone’s camera video settings, not a separate screen-recording menu. To change the quality, open Settings, go to Camera, tap Record Video, and choose your preferred resolution (720p at 30fps, 1080p at 30/60fps, or 4K at 24/30/60fps) and frame rate.
Higher resolutions produce sharper recordings but significantly larger files. A 10-minute 4K screen recording can easily consume 3–4GB of storage. For most real-world use tutorials, app walkthroughs, bug reporting, or saving social media content 1080p at 30fps is the best balance between clarity and file size. Only choose 4K if you’re creating professional content and have plenty of storage available.
Avoiding Common Recording Mistakes
Before you start recording, enable Do Not Disturb or Focus mode. Notifications appear directly in screen recordings, and even a single message popping up can ruin an otherwise perfect capture. Turning on Focus mode keeps your recording clean and prevents accidental exposure of private information.
It’s also important to close sensitive apps beforehand. Screen recording captures everything visible on your screen, including passwords, messages, and financial information. There is no built-in way to blur or hide parts of the screen after the fact, so preparation matters.
Troubleshooting Common Problems
Screen recording is usually straightforward, but when something goes wrong, it’s frustrating. Here are the most common issues and how to fix them.
“The screen recording button is missing from my Control Center”
Solution: You need to add it manually. Go to Settings → Control Center, scroll down to More Controls, find Screen Recording, and tap the green + button. It’ll appear in your Control Center immediately.
“My recording stops automatically after a few seconds or minutes”
This usually happens for one of three reasons:
Low storage: Screen recordings eat up space fast. Check your storage in Settings → General → iPhone Storage. If you’re nearly full, delete some photos/videos or offload unused apps.
Incoming call or FaceTime: If someone calls you while recording, the recording stops. There’s no way around this except enabling Do Not Disturb before you start.
Low battery or Low Power Mode: If your battery is critically low or Low Power Mode is on, iOS may stop the recording to save power. Charge your phone or disable Low Power Mode in Settings → Battery.
“There’s no sound in my recording”
First check: Did you enable the microphone? Long-press the screen recording button before starting and make sure the mic toggle is ON (red/highlighted).
Second check: Was your volume turned up during recording? If you were recording something playing on your phone with the volume muted, there’s nothing for the mic to pick up (remember, iPhone doesn’t capture internal audio natively).
If you enabled the mic and there’s still no sound, try restarting your phone and testing again.
“My recording is laggy, choppy, or freezes”
Close background apps: Too many apps running can slow down the recording process. Double-press the home button (or swipe up from the bottom and pause on newer models) and swipe away apps you’re not using.
Lower video quality: If you’re recording in 4K, try dropping to 1080p. Go to Settings → Camera → Record Video and select a lower resolution.
Restart your phone: The classic IT solution actually works. Hold down the power button and volume button, slide to power off, wait 10 seconds, and turn it back on.
“I can’t share or export my recording the file is too large”
Screen recordings, especially long ones in high quality, can hit several gigabytes. If the file is too big to share via message or email:
Trim it first: Open the video in Photos, tap Edit, and trim out unnecessary parts. Even cutting 30 seconds can reduce file size significantly.
Use a file compression app: Apps like Video Compressor or Video Compress can shrink file sizes by 50-70% with minimal quality loss.
Upload to cloud storage: Instead of sending directly, upload to iCloud Drive, Google Drive, or Dropbox and share a link.
Use AirDrop for nearby sharing: If you’re sharing with someone nearby who has an Apple device, AirDrop handles large files without compression.
“When I tap the record button, nothing happens”
This is rare but frustrating when it occurs:
Restarting your phone first solves it 80% of the time.
Check for iOS updates: Go to Settings → General → Software Update. Outdated iOS versions occasionally have bugs that break screen recording.
Reset settings as a last resort: If nothing else works, go to Settings → General → Transfer or Reset iPhone → Reset → Reset All Settings. This won’t delete your data, but you’ll have to reconfigure Wi-Fi passwords and preferences. Only do this if you’ve tried everything else.
Creative Uses & Pro Tips
Now that you know how to screen record, here’s how people are actually using it beyond the obvious. Some of these might spark ideas you haven’t considered.
Saving social media content before it disappears. Instagram stories vanish after 24 hours, Snapchat messages delete after viewing, TikToks sometimes get taken down. Screen recording lets you keep tutorials, recipes, workout routines, or moments you don’t want to lose. Just respect creators’ content and don’t repost without permission.
Creating step-by-step tutorials for family and friends. Instead of writing out 15 text messages explaining how to change a setting on their phone, record yourself doing it once and send the video. Works great for showing parents how to use new apps, teaching kids how to navigate homework portals, or helping friends troubleshoot tech issues.
Documenting bugs and glitches for tech support. “My app keeps crashing” is vague. A screen recording showing exactly what you tapped, what error appeared, and when it crashed gives tech support everything they need to help you. This works for reporting bugs to app developers, showing IT issues to your workplace help desk, or proving a problem to customer service.
Archiving important information that disappears. Confirmation numbers, rental car instructions, boarding passes, event tickets, recipes from websites that might go down if it’s on your screen and you might need it later, recording it is insurance.
Creating content for social media. Reaction videos, app reviews, mobile game highlights, design process videos screen recording is a core tool for content creators. Combine it with picture-in-picture (using apps like InShot) to show your face reacting while your screen plays.
Work and productivity use cases. Recording Zoom meetings (with permission), capturing webinars you’ve paid for, creating training materials for your team, or documenting processes for your own reference. Remote workers especially find screen recording invaluable for async communication.
Learning and education. Recording portions of online courses for review later (check the course’s terms of service first), capturing lectures if allowed, saving explanations from Khan Academy or YouTube tutorials. Screen recording makes learning rewindable.
One advanced tip for creators: If you want truly professional audio for tutorials, you can connect an external microphone to your iPhone using a Lightning-to-3.5mm adapter (or USB-C adapter on newer models). Plug in any standard microphone, enable the mic toggle in screen recording, and your narration quality jumps significantly. A $30 lavalier mic makes you sound like a podcast host instead of someone talking into their phone.
Frequently Asked Questions
Does screen recording drain the battery faster?
Yes, but moderately. Screen recording uses processing power to capture video and audio simultaneously, which does drain battery faster than normal use. If you’re planning to record a long session, say, a 30-minute tutorial or a full gaming session, start with a full charge or plug in your phone. Closing other apps before recording also helps reduce battery drain.
Can the other person tell I’m screen recording?
For regular apps and content: No. There’s no notification sent to Instagram, TikTok, YouTube, or any other app when you screen record. It’s invisible to them.
For FaceTime or video calls: Ethically, you should always tell the other person you’re recording, even if the app doesn’t notify them. Some apps like Zoom or Teams may show a recording indicator, but FaceTime doesn’t automatically alert participants. That said, recording someone without their knowledge even if technically possible crosses ethical and often legal lines.
How long can I screen record on iPhone?
There’s no built-in time limit. You can record until one of three things happens: your storage fills up, your battery dies, or you manually stop the recording. Practically speaking, a 10-minute recording in 1080p uses about 1-1.5GB of storage. If you have 20GB free, you could theoretically record for several hours, but your battery would likely die first.
Does screen recording capture everything on my screen?
Almost everything, with one major exception: DRM-protected content shows up as a black screen. If you try to screen record Netflix, Hulu, Disney+, Amazon Prime Video, or other streaming services, you’ll get audio (if you have the mic on to capture it through your speaker) but the video area will be completely black. This is intentional copy protection.
Everything else apps, games, social media, web browsing, photos, messages records exactly as it appears.
Can I screen record on older iPhones?
Screen recording was introduced in iOS 11, released in 2017. If your iPhone can run iOS 11 or later, you can screen record. This includes:
- iPhone 5s and newer (for iOS 11)
- Any iPhone from iPhone 6s onward supports the latest iOS versions with screen recording
If you’re on an iPhone 5 or older, you won’t have native screen recording the hardware can’t support it.
Do I need to download an app to screen record?
No. Screen recording is built directly into iOS no App Store download required. You only need third-party apps if you’re trying to do something Apple doesn’t natively support, like recording phone calls or capturing internal audio. For standard screen recording, the built-in feature is all you need.
Will screen recording show my notifications?
Yes, absolutely. Any notification that pops up while you’re recording will be visible in the video. This includes text messages, app alerts, calendar reminders and everything. If you don’t want notifications in your recording, enable Do Not Disturb before you start. Swipe down to open the Control Center and tap the moon/focus icon. Your recording will stay clean, and you can turn it off when you’re done.
CONCLUSION
Screen recording on iPhone is one of those features that feels complicated until you’ve done it once then it’s second nature. The built-in tool handles the basics beautifully: capturing tutorials, saving content, documenting bugs, creating videos. It’s genuinely simple once you know the Control Center button exists and how the microphone toggle works.
The trickier parts recording phone calls, capturing internal audio, troubleshooting silent recordings take a bit more work, but now you’ve got the workarounds. Whether you’re using Google Voice for call recording, QuickTime for internal audio, or just making sure Do Not Disturb is on before you hit record, you have options for just about any scenario.
Start with the basics. Record something simple, a quick app tutorial, a funny conversation thread, whatever. Get comfortable with starting and stopping. Then experiment with the microphone settings, try recording in different apps, see what works for your needs. Screen recording is one of those tools that becomes more useful the more you use it. You’ll find yourself reaching for it in situations you never expected.


Leave a Reply